Whether you’re heading to a race, exploring new trails, or simply wanting the comfort of your own ride on vacation, bringing your bike on your travels can be an exciting experience.
But it’s important to know how to do it.
After all, you don’t want to arrive at your destination to find your bike is damaged – or worse – missing because of airline restrictions or improper packing.
In this guide, we’ll walk you through how to pack a bike for air travel. From what you should know before you go, to making sure it’s on the plane, to putting it back together again, we’ll tell you everything you need to know.
Ready?
Let’s begin!
Pre-Flight Prep
Before you can even book your flight, there are a few things you’ll need to do.
We’ll take a look at flight regulations, picking airlines, and booking your flight.
Let’s start with flight regulations.
1. Checking Flight Regulations
If you want to pack a bike for air travel, it’s important to know a few things.
Here’s what to look out for:
- Bike Policies: Not all airlines treat bikes the same way. Some have special allowances for sporting equipment, while others might have strict limitations. Check the airline’s website for their bike policy or contact customer service for detailed information.
- Additional Fees/Restrictions: Many airlines charge extra fees for transporting bikes. These fees can vary significantly, so factor this into your travel budget. You should also be aware of size and weight restrictions. Airlines often have maximum dimensions and weight limits for checked luggage, including bikes.

2. Picking Airlines
It’s definitely possible to find an airline that will allow you to pack your bike.
But you could go a step further and look for the following:
- Bike-friendly Airlines: Some airlines offer special packages or reduced fees for sporting equipment. Research airlines known for accommodating cyclists.
- Customer Reviews: Read reviews from other cyclists to see which airlines they recommend. Biking forums, travel blogs, and social media groups can be great resources.
3. Booking Your Flight
Once you’ve found an airline, it’s time to book your flight. Here’s what you need to know:
- Notify The Airline: Inform the airline in advance that you will be traveling with a bike. Some airlines require advance notice, and it’s always better to be on the safe side.
- Reserve Bike Space: Confirm the reservation for your bike during the booking process. This ensures the airline is aware and can prepare to handle your bike properly. Make sure to get a confirmation email or receipt that notes your bike reservation.
Getting the Right Equipment
Proper packing equipment is essential to ensure your bike arrives safely at your destination.
Here’s how to choose the best options:
1. Bag Bikes/Cases
Selecting the right type of bike bag or case is crucial for protecting your bike during air travel.
Here’s a quick look at the different options:
Soft Cases
Soft bike cases are typically made from durable, lightweight fabrics like nylon or polyester. They offer some level of protection for your bike but are generally less robust than hard cases.
Pros:
- Lightweight: Soft cases are usually lighter than hard cases, making them easier to transport.
- Compact: They can often be folded or collapsed for convenient storage when not in use.
- Cost-Effective: Soft cases are often more affordable than other cases.
Cons:
- Limited Protection: Soft cases provide less protection against impacts and rough handling compared to hard cases.
- Vulnerability to Damage: They can be susceptible to tears or punctures from sharp objects or rough handling.
- Extra Padding Needed: Additional padding may be required to protect the bike adequately during transit.
Best for: Budget-conscious travelers, shorter trips with less risk of rough handling, and those with limited storage space.
Hard Cases
Hard bike cases are constructed from rigid materials such as plastic or aluminum. They offer maximum protection for your bike but tend to be heavier and bulkier than soft cases.
Pros:
- Superior Protection: Hard cases provide excellent protection against impacts, crushing, and rough handling.
- Durable: Built to withstand heavy use and rough conditions, offering long-term protection for your bike.
- Integrated Padding: Many hard cases come with built-in padding and secure straps to hold the bike in place.
Cons:
- Heavy and Bulky: Hard cases are typically heavier and bulkier than soft cases, which can make them more challenging to transport and store.
- Expensive: Hard cases tend to be more expensive than soft cases due to their durable construction and added protection.
- Storage Space: Takes up more storage space when not in use compared to soft cases.
Best for: High-value bikes, frequent air travelers, and longer trips where the risk of rough handling is higher.
Hybrid Cases
Hybrid bike cases combine features of both soft and hard cases, offering a balance between protection and portability.
Pros:
- Balanced Protection: Provides better protection than soft cases but is lighter and more portable than hard cases.
- Lighter than Hard Cases: Generally lighter and easier to handle than hard cases, making them suitable for air travel.
- Ease of Use: Often designed with wheels and handles for easy transport.
Cons:
- Moderate Protection: While offering better protection than soft cases, they do not provide the same level of impact resistance as hard cases.
- Cost: Can be more expensive than soft cases but are typically cheaper than hard cases.
- Limited Customization and Features: While they strike a balance between protection and portability, they might lack certain features such as specialized compartments for accessories.
Best for: Travelers seeking a balance between protection and portability, and those who travel moderately frequently.
Cardboard Cases
Cardboard bike boxes are exactly what they sound like: cardboard boxes specifically designed to fit a disassembled bike for transportation.
Pros:
- Affordable: Often available for free from bike shops or can be purchased at a low cost.
- Disposable: Can be discarded or recycled at your destination, eliminating the need for storage.
- Lightweight: Lightweight and easy to handle, making them suitable for one-time use.
Cons:
- Limited Protection: Provides minimal protection against impacts and rough handling, requiring extra padding.
- Not Durable: Cardboard boxes can be easily damaged or crushed, especially in transit.
- Time-Consuming to Pack: Requires careful packing and securing of all bike components to prevent damage during transit.
Best for: Short-term or one-time use, budget-conscious travelers, and situations where obtaining a new box at the destination is feasible.

2. Accessories/Tools
When packing a bike for air travel, having the right accessories and tools is essential for ensuring a smooth journey and hassle-free assembly at your destination.
Here’s what you’ll need:
- Extra Padding: You should wrap delicate parts of your bike, such as the frame, handlebars, and fork, with bubble wrap or foam padding to protect them from scratches and impacts. You can also use blankets or towels to provide additional cushioning inside the bike case and prevent parts from shifting during transit.
- Packing Materials: You can secure loose parts and padding in place with zip ties and strong tape to prevent them from moving around during handling. On top of that, you can also use labeled plastic bags to organize small components like bolts, nuts, and washers, making them easy to find when reassembling your bike.
- Multi-Tool Kit: Pack a multi-tool kit containing wrenches, screwdrivers, Allen keys, and other tools necessary for disassembling and reassembling your bike. Choose a lightweight, compact tool kit that won’t add too much bulk to your luggage but contains all the essential tools you’ll need.
- Tire Levers & Pumps: Tire levers are essential for removing and reinstalling your bike’s tires during packing and assembly. Opt for durable, lightweight tire levers that won’t break or bend easily. You should also Bring along a portable bike pump to inflate your tires once you’ve reassembled your bike at your destination. Look for a compact pump that fits easily in your luggage or bike bag.
Extras:
- Spare Tubes: Pack a few spare inner tubes in case of punctures during transit or while riding at your destination.
- Patch Kit: Bring along a patch kit for quick repairs in case of minor punctures or tears in your bike’s tires.
- Chain Lubricant: Apply chain lubricant before packing your bike to prevent rust and corrosion during transit, and bring along a small bottle for reapplication if needed.
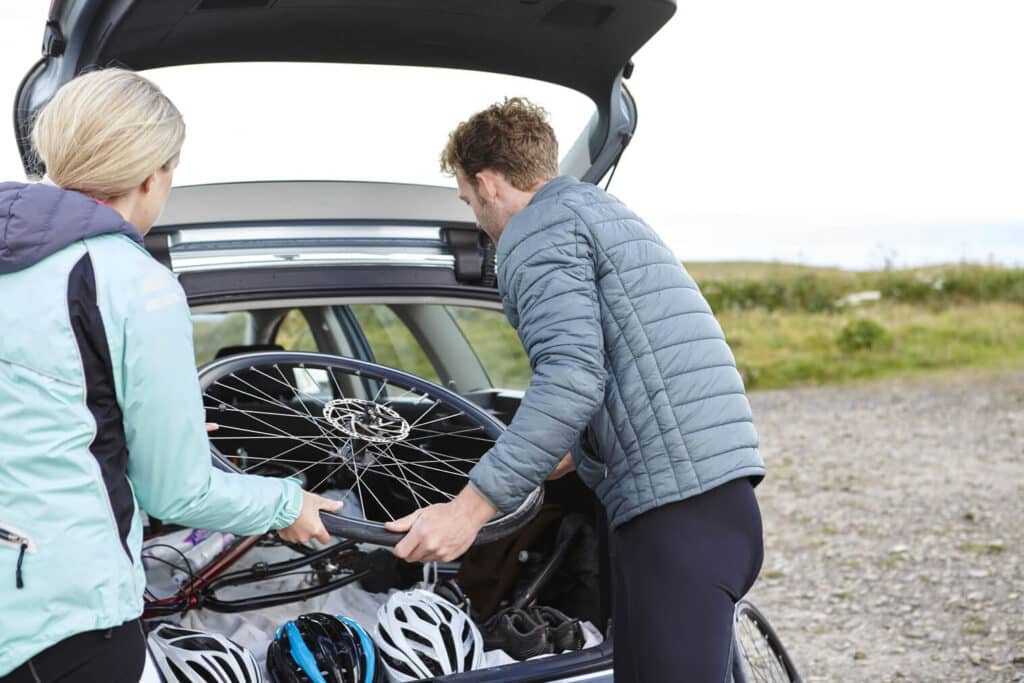
Packing Your Bike
Packing your bike properly is crucial to ensure it arrives at your destination undamaged and ready to ride. Here’s a step-by-step guide to packing your bike for air travel:
Prepping Your Bike
- Thoroughly clean your bike to remove dirt, mud, and grease. A clean bike is easier to pack and helps prevent damage to other items in your luggage.
- Remove accessories such as water bottle cages, bike computers, and saddlebags.
- Use zip ties or Velcro straps to secure loose cables and prevent them from tangling.
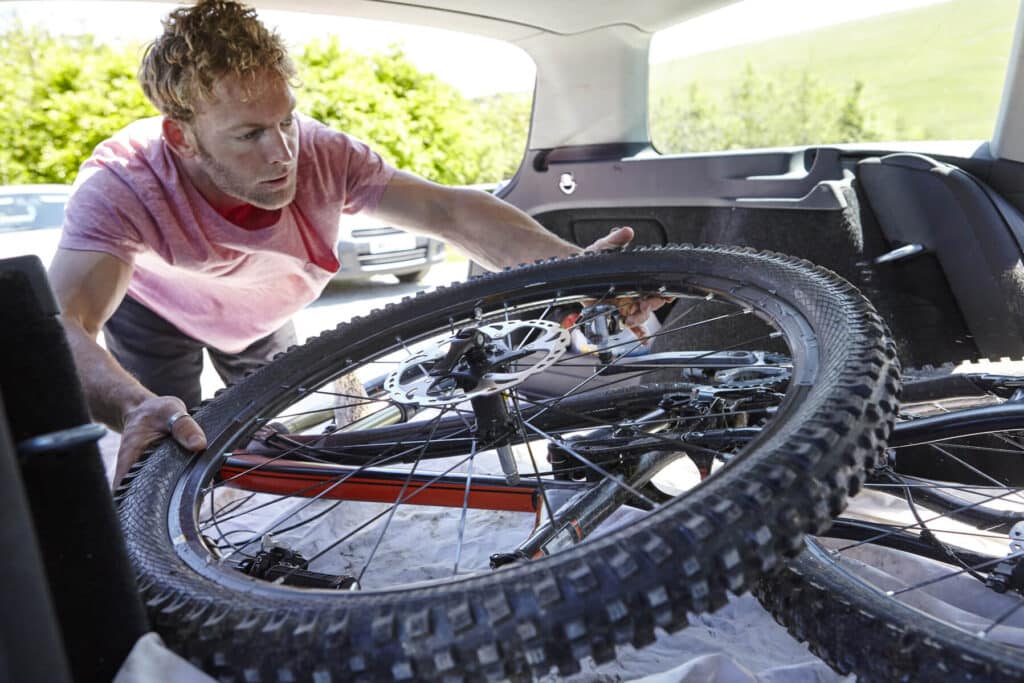
Disassembling Your Bike
- Remove the pedals using a pedal wrench, remembering that the left pedal has a reverse thread.
- Release the quick-release skewers or loosen the axle nuts to remove the front and rear wheels.
- Place the wheel skewers or axle nuts in a small plastic bag and secure them to the frame or wheel.
- Loosen the stem bolts and carefully remove the handlebars from the stem.
- If necessary, remove the stem from the fork steerer tube and wrap the handlebars in bubble wrap or foam padding.
- Loosen the seat clamp bolt and lower the seat post into the frame or remove it entirely, depending on the size of your bike case.
Packing Your Bike
- Place the bike frame in the bike case or bag first, with the drivetrain facing towards the bottom of the case.
- Use foam padding, bubble wrap, or old towels to protect delicate areas of the frame, such as the dropouts, derailleur, and rear triangle.
- Secure the wheels on either side of the frame, with the axles facing outwards. Use foam padding or cardboard discs to protect the disc brake rotors and hub axles.
- Secure the handlebars, pedals, and seat post alongside the frame, ensuring they don’t shift during transit.
- Fill any empty spaces inside the bike case with additional padding or clothing to prevent the bike from shifting during handling.
- Ensure all components are securely fastened and there is no excess movement within the case.
Closing & Securing Your Case
- If you’re using a bike case, follow the manufacturer’s instructions for closing and securing the case.
- Ensure all latches, straps, and buckles are securely fastened. Attach a label with your contact information to the outside of the case.
- Clearly mark the case as fragile to alert baggage handlers to handle it with care.
Documenting Your Bike
- Before closing the case, take photos of your bike from multiple angles. This will serve as documentation in case of any damage during transit and will also help with reassembly at your destination.
Bonus Tips
In addition to the essential steps for packing your bike, here are some bonus tips to further enhance your packing experience and ensure a smooth journey:
Pack Essentials In Your Carry-On: While most of your bike components will be packed in your checked luggage, consider packing essential items like your helmet, cycling shoes, and cycling clothes in your carry-on bag. This ensures you’ll have the necessary gear in case your checked luggage is delayed or lost.
Plan for Reassembly: Before your trip, familiarize yourself with the process of reassembling your bike. Watch online tutorials or practice reassembly at home so you’ll feel confident and prepared when it comes time to put your bike back together at your destination.
Practice Pack: Do a trial run of packing your bike at home before your trip. This will help you familiarize yourself with the process and identify any potential challenges or issues beforehand.
Final Tip – Download The Air Doctor App!
Now there’s just one thing left to do…
Make sure you don’t get sick abroad!
With the Air Doctor app in your pocket, you can access medical advice, get prescriptions, and receive expert medical guidance wherever you are in the world!
Air Doctor’s easy-to-use app gives you:
- A global network of over 20,000 multi-lingual doctors and specialists
- Choice of clinic, at-home (hotel), and video consultations
- Active in 78 countries
- Cross border prescription services
- Video consultation services in up to 21 languages and 84 countries
- 24/7 multi-lingual support
- Transparent pricing, and reviews
- Most common medical specialties

Safe travels!